
Air Fryer Honey Garlic Chicken
Air Fryer Honey Garlic Chicken is a quick, easy, and flavorful meal that works well for busy days when homemade food is needed without spending too much time in the kitchen. The dish features crispy chicken on the outside while keeping the inside tender and juicy. Once cooked, the chicken is coated in a rich honey garlic sauce that is sweet, savory, and slightly sticky, making every bite delicious.
This recipe is a healthier alternative to deep-fried takeout because the air fryer requires very little oil while still creating a crispy texture. The recipe can also be adapted for gluten-free diets by using gluten-free soy sauce. Served with rice and vegetables, it makes a complete lunch or dinner that the whole family can enjoy.
Why This Recipe Is Worth Making
There are plenty of reasons to make this recipe:
- Fast and simple to prepare.
- Uses common, easy-to-find ingredients.
- The air fryer creates crispy chicken with less oil.
- The honey garlic sauce has a delicious sweet and savory flavor.
- A healthier homemade alternative to fried takeout.
- Pairs well with rice, noodles, or vegetables.
- Suitable for lunch, dinner, or meal prep.
Cooking Time Details
- Preparation Time: 10 minutes
- Cooking Time: 25 minutes
- Total Time: 35 minutes
- Servings: 4
- Calories: About 629 kcal per serving
Ingredients
For the Chicken
- 6 boneless, skinless chicken thighs
- Cornstarch or potato starch, for coating
For the Honey Garlic Sauce
- ½ cup honey
- ½ cup soy sauce (gluten-free soy sauce if needed)
- 2 tablespoons brown sugar
- 2 tablespoons ketchup
- 1 clove garlic, crushed or finely chopped
- ½ teaspoon ground ginger
- 1 tablespoon cornstarch, for thickening
For Serving
- Cooked rice
- Steamed green beans or other vegetables
- Sliced green onions, for garnish
Step 1: Prepare the Chicken
Cut the chicken thighs into small, bite-sized pieces. Keeping the pieces similar in size helps them cook evenly.
Place the chicken pieces in a large bowl. Sprinkle with cornstarch or potato starch and mix well until every piece has a light coating.
The starch coating helps the chicken become crispy in the air fryer. For extra crispiness, the chicken can be lightly sprayed with a small amount of oil.
Step 2: Air Fry the Chicken
Preheat the air fryer to 390°F (200°C). Preheating helps the chicken cook evenly and develop a crispy exterior.
Arrange the coated chicken pieces in a single layer in the air fryer basket. Avoid overcrowding or stacking the pieces so hot air can circulate properly.
Cook for approximately 24 minutes. After about 12 minutes, shake the basket or turn the chicken pieces to ensure even cooking.
Chicken breast can be used instead of thighs, but it generally requires less cooking time because it cooks faster and can become dry more easily.
The finished chicken should be golden brown and crispy.
Step 3: Make the Honey Garlic Sauce
While the chicken cooks, prepare the sauce.
Add the following ingredients to a small saucepan:
- Honey
- Soy sauce
- Brown sugar
- Ketchup
- Garlic
- Ground ginger
Place the saucepan over low to medium heat and stir gently. Allow the mixture to warm until it begins to bubble lightly.
In a small bowl, combine 1 tablespoon of cornstarch with a little water and mix until smooth. Slowly pour the mixture into the saucepan while stirring continuously.
Continue stirring until the sauce becomes thick and sticky.
If the sauce remains too thin, add a little more cornstarch slurry. If the sauce becomes too thick, add a small splash of water.
Avoid high heat because the sugar can burn easily.
Step 4: Coat the Chicken
Once the chicken is fully cooked, remove it from the air fryer.
Add the hot chicken to the saucepan containing the honey garlic sauce. Stir gently until every piece is evenly coated.
Allow the chicken to sit in the sauce for 1–2 minutes so the flavors can absorb into the chicken.
For a stronger glaze, the chicken can remain in the sauce slightly longer.
Step 5: Serve
Place cooked rice in serving bowls or plates. Add the honey garlic chicken and spoon additional sauce over the rice if desired.
Serve with steamed green beans or favorite vegetables.
Finish with sliced green onions for freshness, color, and a little crunch.
Tips & Tricks
- For extra-crispy chicken, potato starch can work better than cornstarch.
- Tamari or gluten-free soy sauce can be used for a gluten-free version.
- The amount of honey can be reduced for a less-sweet sauce.
- Store leftovers in an airtight container in the refrigerator for up to 3 days.
- Reheat gently over low heat to prevent the sauce from burning.
- Chili flakes or sriracha can be added for a spicy version.
Why This Recipe Works So Well
This recipe combines simple ingredients with easy cooking techniques:
- The air fryer creates crispiness with very little oil.
- The starch coating adds crunch while helping the chicken remain juicy.
- The honey garlic sauce provides a balanced sweet and savory flavor.
- The preparation is quick enough for busy days.
- The chicken pairs well with a variety of side dishes.
Overall, this meal is a flavorful, easy, and healthier homemade alternative to takeout.
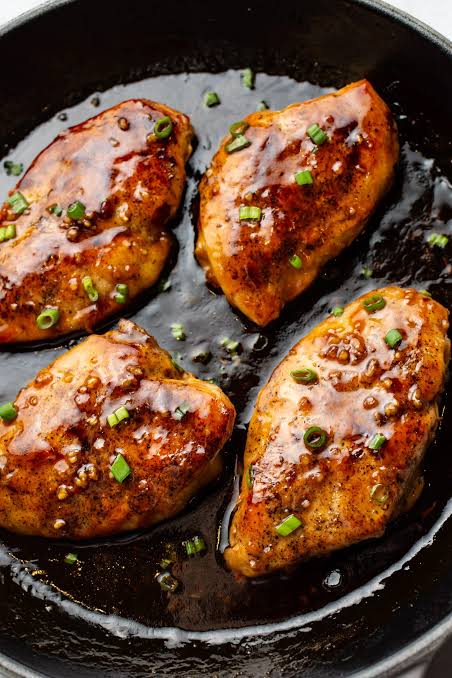
Honey Glazed Chicken
Honey Glazed Chicken is an easy and flavorful dish made with simple ingredients. Chicken thighs or breast are cooked until golden, then coated in a sweet, savory, and slightly tangy glaze. The finished chicken pairs especially well with steamed rice and sliced green onions.
This popular chicken recipe is simple to prepare and delivers plenty of flavor. The combination of honey, soy sauce, garlic, ginger, and vinegar creates a glossy glaze that coats every piece of chicken.
Ingredients
Chicken
- 1 lb (450g) chicken thighs or breast, cut into strips
- Salt and pepper
- 1 tablespoon vegetable or olive oil
For the Glaze
- ¼ cup soy sauce
- ¼ cup honey or brown sugar
- 2 tablespoons rice vinegar or apple cider vinegar
- 2 cloves garlic, minced
- 1 teaspoon ginger, grated
- 1 teaspoon cornstarch mixed with 1 tablespoon water
Instructions
1. Prepare the Chicken
Season the chicken strips with salt and pepper.
2. Sear the Chicken
Heat the oil in a pan over medium-high heat. Add the chicken strips and cook until browned on both sides and nearly cooked through.
Remove the chicken from the pan and set aside.
3. Make the Glaze
Using the same pan, add the soy sauce, honey, vinegar, garlic, and ginger.
Bring the mixture to a gentle simmer, stirring regularly until the sauce begins to thicken slightly.
4. Thicken the Sauce
Add the cornstarch slurry to the sauce and stir continuously until the mixture reaches a thick, glaze-like consistency.
5. Combine and Caramelize
Return the chicken to the pan and toss it in the glaze.
Continue cooking for a few minutes, allowing the glaze to coat the chicken and become glossy and caramelized.
6. Finish and Serve
Sprinkle with dried herbs if desired and serve warm with steamed rice, vegetables, or another preferred side dish.
